Last winter, I was involved in a sewing and fashion challenge with the Atlantic Sewing Guild. Lots of people brought in fabrics from their stash to contribute. A couple of people bundled them together in some way that didn’t quite go together well, to create the challenge with that bundle. Different weights, odd colours, no colour, small pieces, etc. were among the challenges with each bundle. Participants then drew numbers to determine order to “draft” a bundle, and then it was up to everyone to make something from their bundle. Here’s what I started and ended up with.
What I picked
When it was my turn to draft, I picked a “dead brown” bundle (Pic 1 below). It was a dark brown jacquard knit print, and tons of a light brown knit with a flower motif punched out in repeated pattern. Besides the brown, the knit and “porous” fabric were the challenges of my bundle. It was brown and browner, basically, dead brown enough to wear to die in. However, it had one thing going for it, a flowers theme. Being a former graphic designer, colour wasn’t a problem to work with. But I’m definitely a theme guy, so that’s why I picked that bundle.
With the brown and browner theme, I needed to do something with some wow factor. With the flower theme throughout, I wasn’t going to try and force guy stuff for myself. No sense fighting the weakness to try and make something uber-feminine masculine. I was going womanly all the way. Never having made a dress, scandalous dress was where I ultimately settled.
The dress design
Looking through dress patterns of the major dress makers, I found a scandalous dress in Vogue pattern V1047 by Guy Laroche (Pics 2-4 below). That top was hot! It reminded me of something in the old Star Trek series worn by one of the harem of females that seduced Captain Kirk, but it was just hot!
The skirt I wasn’t thrilled about, though. I thought it was neither here nor there on the long or short, though I appreciate the diagonal cut design being nice. I think it was more that fluffiness I didn’t like, even though I usually like contrast in a lot of ways, like to that tightly wrapped top. Looking up the pattern reviews, which you should always do to get an idea of how people made out with it, I saw lots of people having trouble with that skirt. That was all I needed to walk away from it.
What I decided to do was to do a classy contrast to that scandalous top, with its own scandalous touch of the porous fabric to show skin from beneath. From another search, I chose the slim fitting long dress bottom from Simplicity 2253 by Jessica McClintock (pic 5). I felt if I were going to be having a tight fit at the top, I shouldn’t be exploding the woman’s bottoms with a fluffy skirt.
Making the dress top
With that dress design in mind, I set off to make my dress. Sadly, it wasn’t all that straightforward. That top, if made as it were, came out suitable for like a 10 year old with F cups! I might not be the most experienced sewist, but I was in a class with a teacher to verify I did it correctly. After adjusting some things several more times and seeing it couldn’t be modified enough for my model, I threw out the pattern and redrew something similar, but not too similar, on my own. My first independent pattern drafting!
It took 3 tries with my own pattern as well, but that was to get the fit exactly right, with the empire belt where it should be, not because it didn’t fit. Fortunately, there was no wardrobe malfunction with the model during fittings. That top couldn’t be worn with a bra to support. I lined the bottom layer with the brown jacquard print to be “civilized”, but the true scandalous version would have used the porous fabric to play a little peek-a-boo teasing to others looking at it, knowing it had holes and the wearer wouldn’t have been wearing a bra. 😉
So six tries in all for the top! I made it with mock fabric before using the fabrics given for the challenge on the 5th and 6th tries. I thought I would have had it by the 5th. I used the light brown fabric because not only did I get almost 4 metres of it, it was the porous scandalous fabric I wanted the dress to be made with.
Making the dress skirt
The bottom was much simpler. I got it in one try with the proper fitting adjustments to the pattern, using the porous fabric again. The only hiccup was that it didn’t hang out and flow behind as much as I liked so I put some “horse hair”, or the modern plastic equivalent rather, around the bottom. One layer in front cause it didn’t have to hang out much, but two at the back that had to be kept with more effort from collapsing into the model’s shoes.
With the dress made, what was I going to do with the dark brown flower jacquard print knit then? I extended the flowers theme by making a giant flower appliqué of the porous flower motif, and stuck it offset on the right side.
Putting on the appliqué
Having graphic designer skills, I measure the tiny motif and drew it on Adobe Illustrator. There, I enlarged it to the size I wanted. There was only two pieces, the circle centre and pointy ellipse petal. With each, I created a 1/4 inch border around it and printed each twice. I cut out one each along the inner and outer borders. The inner border one was going to be used for dissolvable interfacing. The outer border one was going to be used for the fabric.
I also created a circle with five lines protruding from it like a star to mark on the fabric where the petals were going to go once I have them. Then I marked it on the dress before working on the appliqué pieces.
For each applique piece, I lined up the interfacing evenly in the middle of the fabric after I cut out each. I then cut notches in the curvatures of the fabric because they’d crumple if folded in like I was going to be doing. After cutting the notches, I got some paper glue and spread on the edge of the interfacing with my fingers, so there would be a minimally thin layer. I did it quickly, covering one half of a piece at a time. Then I wrapped the fabric on to it and pressed it to make it stick. Then I did the other side and I had my piece.
Immediately after I got my piece together, I sewed it on to the dress with a stitch around the border as close to the edge as I could get it. That was usually about 1-2 mm with my controlled speed sewing machine. I could sew it to the fully sewn dress because there was plenty of room in the skirt to do this. Besides, since the appliqué crossed the seam, it would have been too hard to do it before assembling the dress.
I sewed each piece immediately after I got it together because the paper glue would still be soft. The very thin layer, once hardened, would break if sewn, posing no threat to a needle breaking, though. It just wouldn’t look as nice.
With the applique flower done, the only thing left to do was to wash the dress so the dissolvable interfacing would be gone, then dry and steam iron it and voila!
I should say with this appliqué technique, I got a game changer for my sewing and design. I can really put any design on most things now, as long as my sewing machine can get at it! For all those things you can’t buy big design or pattern fabrics for, like logos or symbols of anything, I can now put it on my garments! What doors that open!!!
Show time!
So with my model, I headed off to the Atlantic Sewing Guild for our challenge Fashion Show. The ladies there, so far as I can tell, loved both the dress and model (pics 6 & 7), which made me very happy after all that work. They were able to give anonymous comments and I have them listed below the gallery. I’m sure the others got just as good comments, though, because there were a lot of fabulous garments made there!
Then, to complete the flowers theme, I gave my model flowers after she modeled it, for her time and efforts. She modeled it beautifully! Thank you!
Please click here to see more of my fashion and sewing.
-
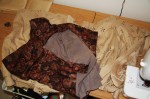
- 1 – Fabrics I got
-
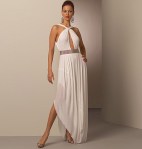
- 2 – Vogue V1047 Front
-
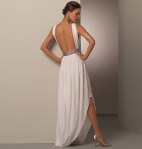
- 3 – Vogue V1047 Back
-

- 4 – Vogue V1047 Front Close-up
-

- 5 – Simplicity 2253 pattern
-
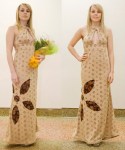
- 6 – Dress I made
-
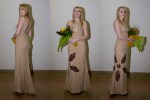
- 7 – Full 260 view of dress
Atlantic Sewing Guild Member Feedback
- VAROOM BROWN!! Very beautiful.
- Lovely style. Cute design.
- Great use of fabric. Your talents amaze me and great use of sewing basics!
- My favourite! Like your flower applique on the beige imitating the flower holes on the beige. Congratulations on your own pattern design!
- Fabulous!! I’m very, very impressed – with your work as well as your good luck in having such a LOVELY MODEL!
- Very original. Lovely dress. Lovely model.
- Well done. Clever to use the flower design from fabric and make an enlarged flower applique.
- Lovely colour on the model.
- Beautiful! Nice use of questionable fabric!
- Great job. Very chic and looks good on the model.
- Very creative. Excellent work.
- Beautiful!
- Very good. Good ideas. Keep up the good work.
- Fantastic. Incredibly creative. Beautiful model.
- Very nice.
- Lovely! Original!
- Brown rocks! You’re amazing!
- Nice & chic.
- Beautiful dress with lovely flower applique.
- Great dress.
- Pretty good job.
- Nice design! Love the theme – well done.
- Incredibly creative and daring. I loved the hem.
- Nice fit. Imaginative.
- I like it! Nice use of fabric. Applique is excellent finishing touch. Congratulations!
- Ingenious.
- Nice colour coordination. Lovely presentation.
