There are lots of details here, but it’s easy once you go through it once or twice, because all it comes down to are the steps below, which you can just try for short video samples without reading the rest of the post, and see if you feel like you need to read the rest of it:
- Go to the online course as if you were going to view it
- Hold the Windows key while pressing g to get the recording interface
- Do a few setups (or not, but if so, you’ll be familiar with after first try)
- Start recording on the recording interface, press Play on the video
- Stop when done recording or when episode ends and URL changes to next episode. The site keeps on playing, but your video recording will not switch, it seems. You have to leave the video to play to record, unfortunately, not like file downloads, but you can keep it on mute.
Do a few demos first for a few minutes each to get things right. Then go at it for real. Good luck!
.
- Introduction
- Technology Used
- Setting Up
– Set up your course platform
– Set your video playback settings
– Open the Win+g interface
– The Overview Menu
– The Audio Menu
– The Capture Menu - Recording
- Wrap-up
- Editing videos
- Converting to Smaller Video File Formats (optional)
- What about Copyright?
- What about Systems not using Windows?
.
1. Introduction
Online learning has been becoming more popular in recent years, with a boost in 2020 from pandemic restrictions forcing some to learn this way, rather than it being a luxury or option. With all the platforms available online, free and/or paid, inevitably, some will not survive. What can one do to retain access to this online learning material, especially the videos, if the demise of these platforms do not offer means for users to continue to access them?
This is what this post will address for Windows based PCs, because that’s what I have a PC. Technically it’s for Window 10 and later, but I don’t think you’d be doing much online learning with an older Windows computer.
.
2. Technology Used
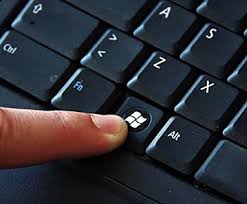 Recording online course videos uses a built-in Windows 10 feature for sharing gaming video captures. You can access it by pressing down and holding the Windows key (see pic at right), then pressing the “g” key. For this reason, I’ll refer to this combination as Win+g.
Since videos can be big files, you may want to download a free program to convert video format from the default provided by this method (see Saving in Smaller Video File Format after Method). However, that is purely optional. I would recommend, instead, that you’d spend the equivalent of the cost of a few cheap online classes for an external hard drive, or some flash drives. For time saved, it’d be far less what than illegal immigrants are paid below minimum wage for work, so unless you valued your time that little, just buy some extra storage space if you need it.
.
3. Setting Up
This method isn’t the sort of simple touch and go sort of app we’ve gotten used to. However, the lack of such an app that I can find is why I’m writing this. That said, it’s not exactly hard, either, as long as you’re not anal about making a feature production. There are just a few annoying features like how you have to let the video play through its entirety, and maybe save at a low resolution if you don’t have great Internet speed, though if you hadn’t, your viewing experience would have been annoying anyway. If you have suggestions, please post as a comment and I will consider them to improve what I have here.
.
Set up your course platform

Get viewing set-up ready
Go into your course platform and get the course ready to watch (or course episode you want to watch). Usually, this is opening your browser and going to the site like you would do in learning.
If you were going to record the entire course, or most of it, try to find the display where you can see lesson summaries. That way, you can video record some of that to be able to find spots within the lesson you want to get to easily later. Otherwise, it could be frustrating trying to find where the content is within 3-12 or more hours of a video!
.
Set your video display defaults

Video settings adjustments
When you press Play to watch your video, move your mouse cursor to hover over the bottom of the video. There, some icons should show up in the bottom right of the video window, like in YouTube. Among these, clicking on the Gears Icon will produce a pop-up menu of some default choices of your video playback. Among the choices you have are Subtitles, the all important Resolution, and Speed.
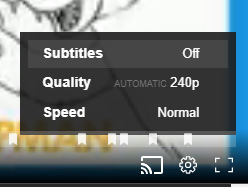
Video settings close-up
Subtitles
Up to you On or Off.
Resolution
Pending your Internet speed options, you may not have much choice. If you set at too high a quality, your video may freeze frequently in loading. You can get faster speeds (if you have the option) to resolve this, as I will have to do. On the other hand, too low a resolution makes a crappy looking video, or one unable to show the details you need. 720p should be good enough to see well on a large monitor, and would be my recommendation. However, try watching 5-10 minutes to see if your Internet can stay ahead in the video loading so the video doesn’t have pauses as it waits for further download. Otherwise, see if 480p produces what you want. Not much sense doing all this if you won’t watch what you saved. Finally, the default value for Resolution is called “Automatic”. That means video quality will adjust to let file download stay ahead of video viewed. That means the video quality will switch, sometimes often, automatically as you view it. If you can accept this, go for it. It can be annoying to watch otherwise.
Speed
This is playback speed, and up to you for Normal or otherwise. Just remember, viewing later at a different speed may result in less than desirable quality. Test it first (after going through the method below) if you want to save videos at speeds other than Normal. Like with resolution, test watch to see if it works for you, both, in the sense of comprehension and video loading speed.
Once you have the settings figured out, reset the video to the start as if to view it from there, and use the following steps to record your video.
.
Open the Win+g interface

Win+g interface (black boxes at left & top)
When you hold down the Windows key and also press the letter “g”, you should get a video recording interface that appears above whatever else was on your screen before. These are the black background boxes seen at left and top in the photo to the right. The photo had some right side cropped for focus.
These black boxes of the Win+g interface will not show up in your recordings so that is quite nice.
Of the four black boxes of of the Win+g interface, you actually only care for one of them. The others are generally setup menus you set once and ignore the rest of the time (see below).
Note that this Win+g interface disappears any time you click off of it. However, it’s still running if you were recording. Just hit Win+g again to bring it back up.
.
The Overview Menu
Overview bar (at top)
The Overview Bar appears at the top, and generally controls what other interfaces you want to see, like Audio, computer performance (for gaming situations), etc. Not that it matters much, but while here, you might want to click on the icon that looks like a monitor (3rd from right). It’ll get rid of the Performance interface down bottom left that you won’t care for. That’s all this bar really does so you can forget about it the rest of the time.

Win+g preferences in Windows Settings
The Gears Icon at right is where you can change default settings. I wouldn’t change much until I am more familiar with default settings you’ll want, unless you were to record videos longer than 2 hours in length (default limit). In said case:
- Open the Settings Menu by clicking on the Gears icon
- Pick General in list at left of the menu
- Click on the link for Edit more preferences in Windows Settings
- Click on Captures in list to left (as in picture to the right)
- Change the Record This value to 4 hours (or whatever value you like but for doing entire courses, you might want the longest possible). It’s too bad they don’t have something longer.
.
The Audio Menu

Audio interface (middle left)
The Audio Interface appears at middle left of screen. It controls audio for the video, as you can guess. The choices you will have on your version of this interface will depend on your set-up, but they should be similar to what’s seen in the picture at right.
The Mix Tab
This is for controlling your system’s internal sound output. That is, not the noise happening around you as you record. The choices are as follows:
- Top choice (1) in the picture is my system’s audio speaker output. Yours will be different, whatever audio speaker/s you have. The takeaway from this selection is that this is what you will hear as you play the video, not what the sound recorded in the actual video will be! You can record on practically silent as the video plays back, but the sound will be normal in your video! Amen for that!
- System sounds wants to know if you want those sounds included. That may include your notification pings, so beware of using! It’s a feature more for gaming videos than here, I would guess. I would recommend turning it off by clicking on the speaker icon at left of the slider.
- “Chrome” is your browser sounds, and may include pings or other alerts. I would recommend turning it off by clicking on the speaker icon at left of the slider.
The Voice Tab
This allows you to add your narration, as well as other sounds / noises to your video. That’s provided you have a microphone on your PC (laptops tend to have one built in but not desktops). Set the volume of input you want for your videos here. However, I’d just skip this to keep it simple and get the video.
After you have your settings set, you can ignore this interface as well! You can even click the speaker icon in the Overview Bar to make this interface disappear to keep things simple visually.
.
The Capture Menu

Win+g Capture Interface
This is the all-important interface where where you control record and stop, as well as allow yourself to insert any narration and sounds on top of the video being recorded from your computer. Among the icons, you only care for three:
- The Dot Icon that is the alternating Start and Stop button, depending on whether a video is being recorded or not.
- The Microphone Icon is whether you want sounds external to the computer, like your voice to narrate, to be recorded.
- The Show all captures choice is to show all the videos you saved that you kept in the default folder (which it will open to). You can move these videos around as if they were any other video you have, unlike apps on tablets on phones that require the app to play, so you can find yourself in the same situation again if the app is abandoned. This is the main way this solution is better than any app solution there might be that I know of!
- Ignore the other icons (camera for screen snapshot, and circular arrow for record last 30 seconds).
.
4. Recording
Read this section fully before doing anything.
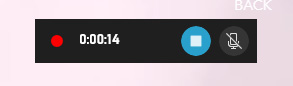
Recording bar
After your set up is ready, click that Dot Icon on the Recording Menu to start recording. You will know it is recording because the circular arrow icon will have disappeared, the Dot Icon will have reversed colour with a white dot on a coloured background now instead of black dot on white background when not recording, and a Recording Bar will appear at right (but not be seen in the recorded video).
The Recording Bar shows a red button and timer to show recording active and time since started. The coloured dot (not always same colour) that has a square is the Stop Button. Press that when you want to end your recording. Finally, the microphone with the line through it prevents noise external to the computer to be incorporated into your recording. If you want to change that, click on it, then again to turn it off.
After recording has started, click on the screen outside of those black box menus and they will all disappear except for the Recording Bar. (Click Win+g to bring back those menus any time to make adjustments, though they will not appear in your video)
Optional step
If you want a record of what’s in the course, you can just navigate through the course listing, whether menus, or scroll through lists of the video, descriptions, length, etc. so it’s like a Table of Contents for the video at the beginning. You wouldn’t need it if you were going to record each video separately rather than the entire course. Some platforms lets you play lessons one after another automatically, while some don’t. Unfortunately, this Win+g method doesn’t know the difference so you’ll either have to keep an eye on it, or edit to chop off (or ignore) after you’re done.
Video settings close-up
Press Play on the video as if you were watching it when you are ready! You can also press the four corners icon at bottom right of the video area to expand to full screen.
Let the video run its course.
Press the Stop Button on the Recording Bar once you are done, or it will stop automatically when the video is done, and that’s it for the recording phase! Unfortunately, you can’t let the recording run the entire course on record. However, you don’t have to keep an eye on the end to make sure you don’t have wasted video, either!
.
5. Wrap-up

Your Captures Menu
When you are done, you can click on the Show your captures choice in the Capture menu to see where it is. You should get a pop-up screen like the one at right that is the Your Captures window.
There should be a list of videos at left. Clicking on one will show details about it. The Win+g system is good enough to give a title as the tab opened as you viewed the course, which you can edit (pencil icon to right of title), which is nice.
Near bottom right, there is a folder icon with Open File Location. That’s where your videos (“captures”) are stored. The folder icon above the list of captures at left also does the same thing. Treat this like you do other folders with video files. Obviously, if you move files out of it, the Win+g system won’t know where you put it so be organized there when you do it, but you can take files with you to view in other places!
Finally, you can delete files using the Trash Can folder.
.
6. Trimming Videos
There are perfectionist types out there who will want to edit videos they capture, cut off the excess of a recording they didn’t keep their eye on when it ended so there’s a lot of wasted file size, or save as duplicates and trim so each one is now a single lesson instead of an entire course. I don’t know much about video editing software, but truncating video is not hard! Try these steps below.
- Right-click the video file, and choose “Open with” > “Photos“.
- Select the “Trim” button located at the upper-right portion of the window.
- Slide the two white sliders to where the portion of the video you wish to keep is in between them. The blue slider only shows the current frame and has no bearing on trimming.
- Once you have the area of the video you wish to keep selected, click the “Save a copy” option located at the upper-right portion of the window.
- Give the video file a new name. Once saved, it will be the new trimmed version of the video.
There may or may not be a loss of quality trimming videos this way, and I’m not sure why that is the case. I would only suggest trying with a few videos, then view again compared to the original, before committing to all your videos, in case you’re not happy with the results.
.
7. Converting to Smaller Video File Formats (optional)

1 TB External HD (May 2020)
Pending your screen size for pixels, that’s the size you’ll be recording at. Your video quality will determine how much quality you get in the picture you see, but it will not affect the pixel size of the video recorded. If the file sizes are too big, you’ll need to record on a machine with a smaller monitor. If you don’t understand any of this, don’t worry. Just record. It’s just for the techies who might want to know.
If you were to record at 1080p picture quality (since that’s what I have), 1 GB will only get you about 15 minutes of course video in the good quality mp4 format that the Win+g system uses! That means those flash drives or memory cards of 64 GB that might feel “big” would only carry 16 hours of video instruction. Not many courses, in other words. A 1TB (terabyte) external hard drive would cost you about $70-100 Cdn and would give you about 250 hours of instruction that is a bit more of a sizable course load. You can get bigger external hard drives, still. That’s what I would recommend for storing courses if you had lots of them. Makes them portable, too!
If you didn’t want to get extra hardware, there is the option to convert your mp4 videos to another good format that’s called wmv. Considering the wmv format is 1/5 smaller in file size, and is generally just as good quality, I have NO idea why the Windows based Win+g system doesn’t use it by default. See how video file sizes and quality compare here if you want the geeky tech of it.
There are many ways to convert video file formats, including mp4 to wmv. There are online sites you can upload a video in one format and have it ready to download in another. There are credible, free programs like the ones listed here you can get and avoid online data transfers. However, when you consider the time that will be required to convert many videos, even if you could click and walk away each time, isn’t $70-100 for a 1 TB hard drive, and a bit more for something with double the storage, worth all that time and nuisance to convert?
 Likewise, if you won’t had a handful of courses, but not enough space on your laptop or desktop, perhaps a collection of 64 GB flash drives for about $40 Cdn would do. That’d be 80 hours of lessons, in 16 hour fragments each. Not bad!
.
8. What about Copyright?
Well, what about it? The 800 cubic feet ghost in the room is just that, an 800 cubic feet ghost. As far as I’m concerned, if you had paid for the rights to have access to this “forever” like platforms often like to Utopianally promise, unless you were refunded or you shared the content beyond your own personal use, you have the right to your own copy. For the fact you had to “work” like following through here to get that copy, you should be able to sue the platform for compensation! If the platforms didn’t like either idea, they should have thought about consequences of their poor management practices sooner to prevent them from having to pull the platform and keep the money… and blamed themselves for their incompetence rather than blame and put the burden on others. That’s what good management with any sort of conscience does, for their information.
.
9. What about Systems not using Windows?
For other systems, here’s what I know, or think is likely true where I can’t confirm:
- Linux and other Operating Systems. I have no idea.
- Android. There isn’t a practical solution I know of on Android (tablets and phones), because recording from Android screen does not allow for sound, probably to deter from duplication due to copyright. You’d need a separate microphone for the sound, and any sound it picks up around you. It’s not some quick and magical solution, but it’s not that hard, either. The memory required, especially if you had tens or hundreds of hours of courses, would not make doing this practical on Android platforms, either.
- Mac. A comparable solution is probably available for Mac desktop computers.
- Mac devices. There is likely even less of a practical solution for Mac based devices (iPhone, iPad). I’m not sure about video recording capabilities there, but the inability to expand storage memory like on Android means you’d need new devices, not a relatively cheap memory card.
.
Whew! That was a LONG and detailed post! Kudos to you if you actually read all this! Thanks and hope it was useful! If you had any suggestions or alternatives, please leave in the Comments section. There is an email request to prevent spam, but I don’t even look at what is entered for email info. Just enter one that’s not real if you want.
.
