This is what became of the dress shirt I cannibalized, about which I wrote the last week. It was one of my funner design dress shirts rather one of the more regal looking ones you’ll see after this, but I still like it a lot.
-
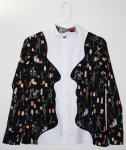
- Front
-
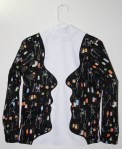
- Back
This dress shirt came from one of many crazy ideas I had while out on a run. I was brainstorming vertical cuts to a dress shirt when I strayed from straight lines and curves to something with a bit more razzle dazzle. That brought me to the famous optical illusion of two faces on the side and a glass in the middle and this design. I wanted more than just black and white, even though the black and white would have made the images a lot clearer. I wanted the illusion to be as subtle as the pieces that made it up, but at the same time carrying punch so that if someone did recognize it, s/he could confirm it immediately. That was why I went with the black razzle dazzle fabric rather than just a straight black or black tone on tone (jacquard) print.
The faces were a little crazy to put on, as you can probably imagine, with the curved edges. I could not just turn the edge under, or zig zag stitch, or even blanket stitch, the edge and leave it clean. So I used double fold bias tape, the quarter inch width, to sew over the edge to keep it from fraying. I stopped and broke the tape at where the upper and lower lips met, being a corner rather than a curve. I tacked it there with a bunch of tight zig zag stitches that were almost embroidery in tightness (2 mm wide x 1.2 mm long). Then I put the faces to the fabric with another stitch over the tape so there are two stitches on that quarter inch width tape. Patience is definitely key here, especially if you have to do 4 edges and 4 bindings!
I used a really light polyester for the white for contrast, but it was so lacking stiffness I had to put some interfacing on underneath for the shirt to hold up right. You see, the faces were extra layers heavier than the white. They were like weights that drooped in a bit and pushed out excess white in the back to leave me with a sort of wave bump along my spine. It made the rest of the garment fit well like hell, though!
I also added a collar stain guard. You know that collar insides get stained from sweat and/or skin dust flakes due to the skin of your neck rubbing against the collar. It’s worse if you have less than white skin like I do, because my skin pigments that rub off are brown. To remedy that staining problem, I sewed in a piece of spandex white on the underside, but had it turned out so if anyone could see inside my collar, they’d see the white. On the other side was a red, white and green print that I didn’t mind getting stained. I sewed it between the serged collar seam and the collar inside itself, at the base of the collar, that I would have sewn to help the collar stand better. If the collar stain guard got dirty enough over the years, I could always rip out that binding seam and put another collar stain guard in place. Saves a lot of money and grief looking at a shirt that constantly bore stains.
The rest of the shirt is another pattern refinement step to getting the dress shirt I desired. Cuffs and neck fitted better than the cannibalized one, but could still use a little improvement. And after a little wear, I realized I had to go back to put on a blanket stitch to that bias tape trim of the faces, and the faces themselves, to help it be a bit more durable. I feel a redo is in store later. For now, I’ll just score it.
| ELEMENTS |
SCORE |
| 1. High contrast | 10 |
| 2. Non-generic colours | 3 |
| 3. Interesting colour combinations | 3 |
| 4. Tone or big bold prints | 10 |
| 5. Symbolism | 10 |
| 6. Good fit | 5 |
| 7. Asymmetry | 2 |
| 8. Creative cuts | 10 |
| 9. Practical wear and care | 7 |
| 10. Memorable look | 10 |
| TOTAL SCORE | 70 |
- Deep black and stark white, with some neon colours on the black is about as contrasty as things get.
- The neon colours do count for something.
- Ditto for point 2.
- The whole thing is a bold print!
- Illusions, faces, glass, very recognizable, what more could one want?
- Not bad, but not great, either.
- The pattern scatter things a big, but it’s pretty much symmetric.
- How many faces have you seen used as a cut? It’s technically applique, but works as if they were two pieces joined at the face and background seam line.
- The blanket stitch put on after initial sewing meant it wasn’t super durable, but should be reasonably good now. The redo will definitely get a few more points here.
- If you recognized what was on this shirt, I don’t think you’d forget it any time soon. Someone may have to ask you to recall it to remember it, rather than you recalling and telling others, but you’d probably remember.
Please click here to read more of my fashion writings and garment making.
